Investigate primary sources to discover how propaganda was used to influence people’s opinions about U.S. involvement in World War I.
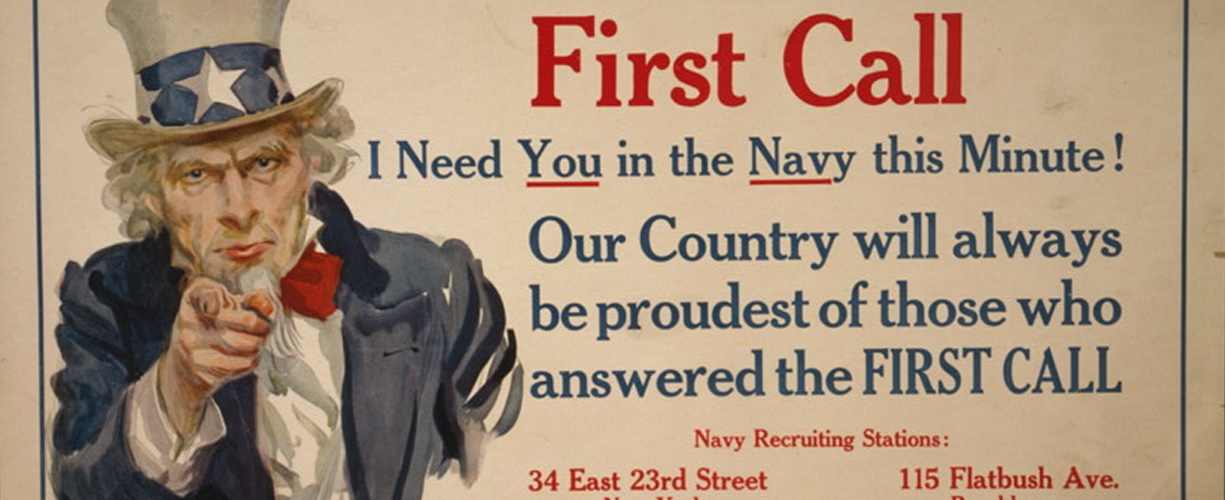
Propaganda is information, primarily biased or one-sided, that is used to promote a specific cause or point of view. Propaganda is often used in advertising and politics.
WORLD WAR I AND THE BIRTH OF AMERICAN PROPAGANDA
World War I began with an assassination in Eastern Europe in 1914, but the war quickly spread as more countries got involved. By 1917, the United States could no longer remain neutral. In April that year, Congress declared war on Germany, and the military mobilization effort kicked into gear. The U.S. military needed more young men to enlist, and the federal government wanted American citizens to rally support behind the war effort.
The need for U.S. citizens’ support led to the creation of the U.S. government’s Division of Pictorial Publicity and the Committee on Public Information and World War. Led by artist and illustrator Charles Dana Gibson, artists from all over the country created posters encouraging citizens to “do their part” to support the war. Posters and ads went up all over American communities, encouraging people to enlist or to work in industries that supported the war. Some posters and ads were designed to make the enemy look evil and dangerous. Other posters and ads showed the United States and its allies as virtuous and good. Still, other posters showed women working in jobs that had traditionally been held by men. The purpose of these kinds of posters and ads was to recruit female workers. As young men were sent to fight in Europe, if more women worked, factories could remain open.
The ads and posters helped drive a strong sense of unity and patriotism nationwide and also built support for unpopular measures, like rationing food and fuel. Posters, film clips, songs, and movies all helped to promote a particular opinion about World War I. This propaganda also served to rally positive support for U.S. and allied troops.
Your Challenge
Using evidence from the primary sources, make your case about the effectiveness of World War I propaganda.
When you have finished making your case, comment on the similarities and/or differences between propaganda used during WWI to propaganda today, and the impact it can have on our lives.
Teachers
Have your students take this challenge and make their case! To begin, send your students to this website with this challenge’s code.
Using evidence from the primary sources, make your case about the effectiveness of World War I propaganda.
When you have finished making your case, comment on the similarities and/or differences between propaganda used during WWI to propaganda today, and the impact it can have on our lives.
individual and group actions taken to improve or identify areas of concern or causes to address
conservation
using natural resources in a responsible way
D
discrimination
unfair treatment of people based on something like race, gender, or age
disenfranchisement
the practice of not allowing, or depriving, someone of their rights
F
federal oversight
the responsibility of the federal government to keep a close watch on organizations and make sure they are following specific rules
federalism
a system of government that divides power to make laws between the national, state, and local levels
freedom of press
the right of newspapers, magazines, websites, and other publications to report news without being controlled by the government
freedom of speech
the right to express your opinions without government interference. This right is protected by the First Amendment to the Constitution
I
immigrant
a person who comes to a country to live there
immigration
the act or instance of coming into a foreign country to live
indigenous
the original or earliest known inhabitants of an area, with their own culture and language, before colonists and settlers began to occupy the land
Industrial Revolution
the period of time in the 18th and 19th century when machines were widely used to produce goods
internment
the act of putting someone in a prison for political reasons or during a war
J
Jim Crow laws
race-based laws to force the legal separation of African Americans and white people in public places in southern United States
P
political protest
a public demonstration of disapproval related to the actions or policies of the government
political speech
a statement made by a candidate for office about how government should be run, and any other opinions of the political process or social issues
preservation
setting aside the land and protecting it as is
propaganda
information, primarily biased or one-sided, that is used to promote or publicize a particular cause or point of view
R
representative democracy
a system of government where all eligible citizens vote to elect people to pass laws for them
S
segregation
the separation of people based on their race, ethnicity, gender, or religion
sovereignty
the right to “to have control over your own lands, and resources, and assets, and to have control over your own vision for the future, and to be able to absolutely determine your own destiny.” Wilma Pearl Mankiller (Former Principal Chief of the Cherokee Nation)
V
voter suppression
the act of preventing a person or groups of people from voting even when they are eligible to vote
W
worker protection laws
laws designed to protect workers from conditions that are harmful to employees’ life and health
Your Challenge
Using evidence from the primary sources, make your case about the effectiveness of World War I propaganda.
When you have finished making your case, comment on the similarities and/or differences between propaganda used during WWI to propaganda today, and the impact it can have on our lives.
To get started, give your folder a title and description, save, and then click the blue + box to take notes on a primary source.
CREATE NEW FOLDER
Case Presentation URL
To view or present your case in a non-editable mode, go to the URL below.
When you want to continue editing your case, come back to https://mycasemaker.org and enter the code below.
Case code copied!
Create My Case
Copy this Challenge to Edit
Help
This view shows a Single Challenge. Each Challenge is a scenario based on a real civics issue. There are additional thoughts to help you consider the scenario in the blue Ideas tab along the right side of the screen.
Teachers
Use this view to find a Challenge to give to your students. Read through the entire Challenge scenario to get a feel for not only the issue at hand, but the angle this scenario wants students to take in making a Case.
After you’ve read the Challenge scenario, be sure to check out the Primary Sources your students will use to find Evidence when making a Case.
Be sure to check the Primary Sources tab
And carefully read the Challenge directive students will use to formulate their Case idea.
Your Challenge directs students on how to think about their case
When you’re ready to give this Challenge to your students, simply click the Challenge Code button to find this Challenge’s unique code.
Each Challenge has a unique code – share this with your students to get them started
Then, send your students to this website and tell them to enter the Challenge code you’ll give them and they’ll be on their way toward making a Case.
Customize this Challenge
If you are logged in with a free teacher account, you can customize any Challenge. Just click this button to get started.
Make your own customizations to this Challenge by making a copy to work on.
Students
Use this view to review the Challenge scenario given to you by your teacher. Read the story and imagine the lives of the people involved. Think about how you would react if you were in the same situation.
Pay special attention to the directions in Your Challenge. This tells you how to think about making your Case.
Your Challenge contains directions on how to formulate a Case
Be sure to check the Primary Sources tab. The items you find there are critical because you will be using them as Evidence to piece together your Case.
Be sure to check the Primary Sources tab
For additional ideas as you consider how to make your Case, take a look at the blue Ideas tab , along the right of your screen, just under the Help tab.
Finally, when you’ve reviewed everything and you’re ready to make your Case, click the Create My Case button.
Click Create My Case to start making your personalized Case
When you create a Case, you are presented with a window where you can enter a title and description, as well as your name and email.
Enter some details to create your case
Your name is used to help identify you if you are using presentation mode (a PowerPoint-like online presentation of your case directly from this site, like you would use to present in front of your class), and in a listing to your teacher privately if you are working from a teacher-made custom Challenge. Your email is optional and will only be used once to send you information about your Case so you can easily retrieve it. Your personal information will never be shared with any third party, and your email is not stored in the system.
What do I do here?
Read the challenge and look over the primary sources.
If you want your students to work on this Challenge, click on the blue Challenge Code button. Copy and share that code with your students. They just need to visit this website and enter the code to begin.
When you’re ready, click on the blue Create My Case button to begin. Then you’ll investigate the primary sources and add your own notes to build your case.
If you’re stuck, check the blue Help tab on the right side of your screen. Plus, the challenge and each primary source has specific tips to help you along, available from the blue Ideas tab that appears just below Help.
Thinking Questions
What different kinds of propaganda were used during World War I, and which groups of Americans were they designed to appeal to?
What types of symbols, words, and design elements were used in the propaganda?
What was the impact of World War I propaganda? How does propaganda impact people today?
Help
This is a collection of Primary Sources for the Challenge you’re reviewing. These are documents, photographs, videos, political cartoons, and more, from the Library of Congress, selected to help you make your Case.
To investigate any Primary Source, simply click into it to see it in detail.
Choose any Primary Source to see it in detail
Teachers
Review these Primary Sources so you understand what your student will be working with. Students are able take entire sources, or parts of a source using cropping tools, and make notes to serve as Evidence when they make their Case.
If you are logged in with a free account, you can also customize your Challenge, including the ability to change Primary Sources that are includes, and to put your own notes on any Primary Source, as a way to give direct and specific instruction to your students.
Students
Along with the Challenge scenario, review these Primary Sources carefully. Think about what each one means in relation to the issues of the Challenge. You’ll be using these sources to make Evidence that forms your Case.
Help
Using the Challenge scenario and the Primary Sources association, it’s time to make your Case. A Case consists of one or more folders, each of which can contain Evidence you find within the available Primary Sources. If you’re having trouble visualizing what you will be making, jump down to the Presentation section below first.
You can always refer to the Challenge scenario and Primary Sources from these tabs
First, notice that you can change your Case’s title or description at any time, right from the top of the view.
If you’d like to change your Case details, just click into either the title or description field and make your edits. Be sure to Save afterward.
Below that, you’ll see your first folder, but it will be empty. You need to fill it in.
You start with a blank folder. Your case will consist of one or more folders, each with a title, description, and Evidence you find in the Primary Sources.
You could begin by entering a title and description, but without Evidence in the folder, it might not be clear quite yet how you want to organize things. Instead, click the blue + box to add your first piece of Evidence.
Click the blue + box to add a new piece of Evidence.
Once you click that, you’ll be take to the Primary Sources listing for your Challenge. Select a Primary Source and inspect it, looking for clues. Remember, there are always ideas to help you in the tabs along the right side.
Once you’ve cropped an image to find a particular detail, trimmed a video, or whatever else you’ve selected as your Evidence, and added your own note, you’ll be returned to My Case with your piece(s) of Evidence in place within a folder. As you add Evidence, you can decide what your folder is about.
This folder has been filled in with a title, description, and two pieces of Evidence taken from Primary Sources.
In this example image, we’ve decided our folder is about Opinions. You can enter a title and description, but always be sure to hit Save after you make edits to these folder details.
You may update each folder’s information at any time, but be sure to save it.
Of course, you’re not limited to just one folder. Your presentation can cover any number of ideas, and each can be a folder for organization. To make a new folder, just click the Create New Folder button.
You can create any number of folders.
When you have more than one folder, they simply line up one after the other within your Case. And each folder can have a title, description, and pieces of Evidence pulled from Primary Sources.
This shows a second folder below the first, also including a title, description and some Evidence.
As you continue to add folders, and add Evidence into folders, you may decide things aren’t organized just how you’d like. That’s fine. You can always move things around. Simply drag and drop pieces of Evidence between folders, or to reorder them within a folder. And you can reorder your folders by drag and drop, too.
If you have collected some Evidence but don’t think it belongs in the folder where it was originally placed, simply drag it to another folder.If you don’t like the order of your folders, simply drag them to reorder.
So, that’s how you put together a Case and keep it organized. What’s next?
Well, you can use your Case simply as a reference, like if you are writing a paper or having a debate. Or you can directly present your Case from this website, using your Case’s presentation URL.
A Presentation
You may want to present your Case directly from this website, like a PowerPoint slide show. You might even turn in your presentation URL to your teacher to complete your Challenge assignment. But of course, you don’t want to give away your Case edit code, since that’s lets anyone make changes to your Case. To keep your Case editing private for yourself, but allow others to see your Case online, share your Case Presentation URL.
When you’re ready to view your Case as a presentation, click the Case Presentation URL button to get your unique URL
When someone (including you!) goes to your Case Presentation URL, they’ll get to see everything you put into your Case, in a convenient slide show presentation.
This begins with your title screen.
Your Case title and description start the presentation
From there, we see information about your first folder, to set the stage for Evidence that will appear.
Your folder titles and descriptions serve to organize your presentation
After the folder information, the presentation steps through each piece of Evidence in that folder, in order, one at a time.
Each piece of Evidence is presented as you cropped it, with your notes below
And then your presentation continues, going through each piece of Evidence and each folder, just as you’ve organized them, until it reaches the end.
Your Case presentation continues through each of your pieces of evidence and through all of your folders, one at a time.
So, that’s how you make a Case and give it as a presentation. Good luck!
Help
This is where you can Customize a Challenge. You’re able to modify the title, description, scenario, and more, as well as alter the Primary Sources, and leave notes specifically for your students.
There are a number of fields you can customize, but before you get started, it would be good to know where all of these things will end up. Here’s a handy reference, with customizable field names listed in orange.
The sections noted by orange field names can be customized by you.
At the top of the screen, you’ll see fields that allow you to edit the title and description, followed by fields for the full text, prompt, and highlighted text.
Editing a Custom Challenge’s title and descriptionEditing a Custom Challenge’s full textEditing a Custom Challenge’s promptEditing a Custom Challenge’s Highlighted Text
Below all of the above, you’ll see a space to enter three Challenge Prompts. These are little bits of extra information to help spur your students when they are making a case.
Editing a Custom Challenge’s prompts
But where do those appear? They show up in the Ideas tab that sits along the right side of the screen when your students are working with your Challenge. Clicking that tab shows the prompts you’ve entered.
Challenge Prompts appear from the Idea tab
Customizing Primary Sources
You may want to change the Primary Sources being used for your custom Challenge. At the bottom of the Customization screen, you can do so.
Customizing Primary Sources
For each Primary Source you have associated with your custom Challenge, you can enter a special teacher’s note.
Adding a teacher’s note to Primary Sources
These notes appear from the special teacher notes tab when students are looking at individual Primary Sources.
Viewing a teacher note from an individual Primary Source
You can remove any Primary Source you don’t want to include simply by clicking the Remove This Source button associated with it.
Plus, you can add new Primary Sources from our pool of available options. [Ed. Note: There are approximately 120 sources currently in the database, with plans to add more.]
Add New Sources
When you choose to add new sources, an overlay panel lets you scroll through available options, each of which can be viewed in another window. Select the one(s) you want with the available checkboxes, then click Add Chosen Sources.
Select new Primary Sources to include in your custom Challenge
When you have all the text fields updated for your Challenge and all the Primary Sources in place, click the Save Your Custom Challenge button.
Save Your Custom Challenge
You can always return to the Customize tab for this Challenge to make additional edits.
When you’re done and ready to share this new custom Challenge with your students, click the Challenge Code button, just as you would for any Challenge, and share that code with your students.
Share your custom Challenge code with your students